The Worksheet Ruler |
The worksheet ruler can be used for setting tabs or aligning regions in your worksheet.
Click in a blank spot in your worksheet.
Select Ruler from the View menu.
The worksheet ruler appears at the top of the window.
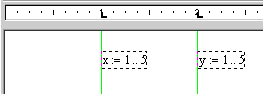
Click on the ruler wherever you want the alignment guideline. A tab stop symbol appears.
Right-click on the tab stop symbol and choose Show Guideline from the menu. A green vertical line appears down the whole worksheet.
If you need multiple guidelines, just repeat the steps above.
You can also set guidelines and tabs using the Tabs choice on the Format menu.
Select and move regions next to the guidelines to align them.
To remove an alignment guideline, right-click on the ruler tab stop and choose Show Guideline from the menu to uncheck it.
When you click in a text region, the worksheet ruler changes to the text ruler. It is the same size as the text region. Use it to set tab stops and indentation in text.
To move a tab stop, click on its symbol, hold the mouse button down, and drag it along the ruler. You can remove tab stops by moving them off the ruler.
You can change the measurement used in the ruler by right-clicking on the ruler and choosing Inches, Centimeters, Points, or Picas from the menu.
The ruler measurement system is saved when you create a template. You can save the system you want for all your documents in the template file NORMAL.XMCT.