
|
1.1 Who should read this document
2.1 Multi-networking and firewall policy
2.6 Configuration export and import
3.5 New ways to do familiar tasks
3.6 ISA Server computers with a single network adapter
4.1 Scenario 1: Export a configuration
4.2 Scenario 2: Access the Internet from the Internal network
4.3 Scenario 3: Create and configure a restricted computer set
4.4 Scenario 4: Create a perimeter network using the Network Template Wizard
4.5 Scenario 5: Publish a Web server on the perimeter network
4.6 Scenario 6: Publish a Web server on the Internal network
4.7 Scenario 7: Configure virtual private networking
4.8 Scenario 8: Modify system policy
4.9 Scenario 9: Import a configuration
 |
1.0 Introduction |  |
Microsoft® Internet Security and Acceleration (ISA) Server 2004 introduces multi-networking support, easy-to-use and highly integrated virtual private networking configuration, extended and extensible user and authentication models, and improved management features, including configuration import and export.
|
1.1 Who Should Read this Document | |
Read this document if you:
After you read this guide, for more information about ISA Server features and functionality, see ISA Server Help.
|
1.2 What's in this document | |
This document includes an overview of product features introduced in this release of ISA Server 2004. It also provides installation instructions. Most importantly, this document includes walk-throughs that you can implement in a laboratory environment to familiarize yourself with the product features. The best way to understand ISA Server features is to use them, so we recommend that you set up a laboratory and try the walk-throughs in this document. For details, see Feature Walk-through.
Much of the information included in this document is also available in online format, integrated into ISA Server online Help.
|
2.0 Feature Overview | |
The following table lists new and improved ISA Server 2004 features. More detail is provided in the sections that follow.
| Multi-networking | ||
|---|---|---|
| New or improved | Feature | Description |
| New | Multiple network configuration | You can configure one or more networks, each with distinct relationships to other networks. Access policies are defined relative to the networks, and not necessarily relative to a given Internal network. Whereas in ISA Server 2000, all traffic was inspected relative to a local address table (LAT) that included only address ranges on the Internal network, ISA Server 2004 extends the firewall and security features to apply to traffic between any networks. |
| New | Unique per-network policies | The new multi-networking features of ISA Server enable you to protect your network against internal and external security threats, by limiting communication between clients even within your own organization. Multi-networking functionality supports sophisticated perimeter network (also known as a DMZ, demilitarized zone, or screened subnet) scenarios, so that you can configure how clients in different networks access the perimeter network. |
| New | Stateful inspection of all traffic | You can examine data crossing the firewall in the context of its protocol and the state of the connection, no matter the source or destination. |
| New | NAT and route network relationships | You can use ISA Server to define relationships between networks, depending on the type of access and communication allowed between the networks. In some cases, you may want more secure, less transparent communication between the networks. For these scenarios, you can define a network address translation (NAT) relationship. In other scenarios, you want to simply route traffic through ISA Server. In these cases, you can define a route relationship. |
| New | Network templates | ISA Server includes network templates, which correspond to common network topologies. You can use the network templates to configure the firewall policy for traffic between networks. When you apply a network template, ISA Server creates the necessary set of rules to allow traffic, in accordance with your specified policy. |
| Virtual private networking | ||
|---|---|---|
| New or improved | Feature | Description |
| Improved | VPN administration | ISA Server includes a highly integrated virtual private network (VPN) mechanism. You can administer VPN connections through ISA Server Management as you would administer physically connected networks and clients. You have the full functionality of ISA Server available for VPN connections, including monitoring, logging, and session management. |
| New | Stateful inspection for VPN | VPN clients are configured as a separate network. Therefore, you can create distinct policies for VPN clients. The rule engine discriminately checks requests from VPN clients, statefully inspecting these requests and dynamically opening connections, based on the access policy. |
| New | Interoperability with third-party VPN solutions | Because of support for industry standard Internet Protocol security (IPSec), ISA Server 2004 can plug into environments with existing VPN infrastructures from other vendors, including those employing IPSec tunnel mode configurations for site-to-site connections. |
| New | Quarantine Control | VPN clients can be quarantined by ISA Server in the Quarantined VPN Clients network, until their compliance with corporate security requirements is verified. |
| Security and firewall | ||
|---|---|---|
| New or improved | Feature | Description |
| New | Extensive protocol support | ISA Server 2004 extends ISA Server 2000 functionality, by allowing you to control access and usage of any protocol, including IP-level protocols. You can use applications such as ping and tracert, and create VPN connections using the Point-to-Point Tunneling Protocol (PPTP). In addition, Internet Protocol security (IPSec) traffic can be enabled through ISA Server. |
| Improved | Authentication | Users can be authenticated using built-in Microsoft Windows® or Remote Authentication Dial-In User Service (RADIUS) authentication types, or other namespaces. Rules can be applied to users or user groups in any namespace. Third-party vendors can use the software development kit to extend these built-in authentication types, offering additional authentication mechanisms. |
| Improved | Publishing | With ISA Server, you can place servers behind the firewall, either on the corporate network or on a perimeter network, and securely publish their services. |
| Cache | ||
|---|---|---|
| New or improved | Feature | Description |
| Improved | Cache rules | With the centralized cache rule mechanism of ISA Server, you can configure how objects stored in the cache are retrieved and served from the cache. |
| Management | ||
|---|---|---|
| New or improved | Feature | Description |
| Improved | Management | ISA Server includes new management features, making it easier to secure your networks. New user interface features include a task pane, a Help tab, an improved getting started wizard, and a new look for the firewall policy editor. |
| New | Export and import | ISA Server introduces the ability to export and import configuration information. You can use this feature to save configuration parameters to an .xml file and then import the information from the file to another server, enabling simple replication of firewall configurations for multiple site deployment. |
| New | Dashboard | A single view presents a summarized version of key monitoring information. If you note a problem, you can open detailed monitoring views for more information. |
| New | Log viewer | The ISA Server log viewer displays the firewall logs in real time. You can display logs in an online real time mode, or in a historic review mode. You can apply filtering on log fields to identify specific entries. |
| Improved | Reporting | You can generate recurring or one-time-only reports on Web usage, application usage, network traffic patterns, and security. |
|
2.1 Multi-networking and firewall policy | |
Previously, the concept of an Internal network was all computers at your corporation. The External network was all computers outside your corporation, generally accessible by means of the Internet. Today's view of the network includes users accessing their corporate networks using mobile computers, thereby making themselves virtually part of different networks. Branch offices connect to headquarters, and they want to use headquarters resources as if they are part of the network. Many corporations make their servers on the corporate network—and especially their Web servers—publicly available, but want to do so by separating those servers into a different network. The multi-networking functionality of ISA Server enables you to secure these more complex network scenarios. Multi-networking support affects most ISA Server firewall features.
You can use the multi-networking features of ISA Server to protect your network against internal and external security threats by limiting communication between clients, even within your own organization. You can define relationships between the various networks you define in ISA Server, thereby determining how computers on each network communicate with each other by way of ISA Server. You can also group computers into ISA Server network objects such as computer sets and address ranges, and configure an access policy specific to each network object.
In a common publishing scenario, you might want to isolate the published servers on their own network, such as a perimeter network. The multi-networking functionality of ISA Server supports such a scenario, so that you can configure how clients on the corporate network access the perimeter network and how clients on the Internet access the perimeter network. You can configure the relationships between the various networks, defining different access policies between each network. Configuring a perimeter network topology is made easier through network templates and network template wizards in ISA Server.
The following figure illustrates a multi-networking scenario.
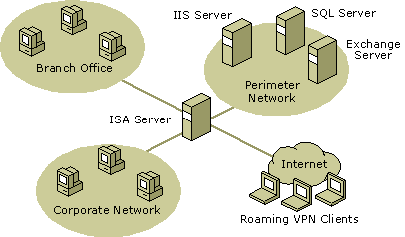
In the figure, the ISA Server computer connects between the Internet (External network), the corporate network (Internal network), and the perimeter network. Three network adapters are on the ISA Server computer, each connected to one of the networks. Using ISA Server, you can configure different access policies between any pair of networks. You can determine if and how computers on each of the networks communicate with each other. Each network is isolated from the other, and is only made accessible when you configure rules to allow communication.
To implement the multi-networking scenarios, ISA Server introduces the following concepts:
Networks include one or more computers, typically corresponding to a physical network, defined by ranges of IP addresses. Network objects are any group of computers that you define, for example, single networks, network sets of two or more networks, or computers sets for which you want to create distinct access rules. You can apply rules to one or more networks or network objects, or to all addresses except those in the specified network or network object. Each network adapter on the computer can be mapped to a single network. You can establish the types of ISA Server clients that are supported on a particular network: Firewall, Web Proxy, or both.
ISA Server comes preconfigured with the following networks:
The Local Host, VPN Clients, and External networks are built-in networks, which cannot be deleted or created by the user. The Internal network is a predefined network, which is created upon installation, and it can be modified or deleted.
Network sets can be configured to include specific networks. Alternatively, network sets can be defined to not include (that is, exclude) specific networks.
These rules can be applied to networks, network sets, or network objects:
For access rules, you specify a destination network and a source network to which the rule is to be applied. The source network indicates which networks are allowed or denied access to the specified destination networks. For server publishing rules, you specify a source network, which is allowed access to a specific computer.
Network rules define and describe a network topology. Network rules determine if there is connectivity between two networks, and what type of connectivity is defined. Networks can be connected in one of the following ways:
Route network relationships are bidirectional. If a route relationship is defined from network A to network B, a route relationship also exists from network B to network A. Conversely, NAT relationships are unique and unidirectional. If a NAT relationship is defined from network A to network B, no network relationship can be defined from B to A. You can create a network rule defining both relationships, but the second network rule in the ordered list of rules will be ignored by ISA Server.
Upon installation, the following default rules are created:
Network rules are processed in order, for each network.
|
2.2 System policy | |
When you install ISA Server, a default system policy is created. The system policy defines access rules between the ISA Server computer and the networks connected to it, for specific resource access.
Note: All of the system policy categories are enabled by default when you install ISA Server, with the policy applied specifically to the Internal network. You can modify the settings of the system policy. We recommend that you disable the categories of the system policy that you do not require in your configuration of ISA Server.
The system policy contains the following categories:
When you enable or disable a system policy configuration group or an item under a configuration group, ISA Server enables or disables the related system policy access rules.
|
2.3 VPN integration | |
ISA Server helps you set up and secure a virtual private network (VPN). A VPN is a collection of computers that are connected to the corporate network securely from remote locations on the Internet. With a VPN, you can send data between two computers across a shared or public network in a manner that emulates a point-to-point private link.
VPN connections allow users who work at home or other remote sites to obtain a remote access connection to an organization server, using the infrastructure provided by a public internetwork, such as the Internet. From the user's perspective, the VPN is a point-to-point connection between the computer (the VPN client) and an organization server (the ISA Server computer). The exact infrastructure of the shared or public network is irrelevant, because it appears as if the data is sent over a dedicated private link.
VPN connections also allow organizations to have routed connections with other organizations over a public internetwork, such as the Internet, while maintaining secure communications (for example, between offices that are geographically separate). A routed VPN connection across the Internet logically operates as a dedicated wide area network (WAN) link.
There are two types of VPN connections:
By using the ISA Server computer as the VPN server, you benefit by protecting your corporate network from malicious VPN connections. Because the VPN server is integrated into the firewall functionality, VPN users are subject to the ISA Server access policy defined for the preconfigured VPN Clients network. All VPN clients belong to the VPN Clients network, and they are allowed access to resources on the Internal network in accordance with a predefined policy.
Although the VPN users are virtually part of the Internal network address range, they are not necessarily subject to the Internal network's access policy, as you configured it for ISA Server. Special rules can be configured to allow users access to network resources.
Because an access policy can be configured for the VPN Clients network, VPN clients are subject to the same stateful inspection mechanisms as any client communicating between networks through ISA Server.
All VPN connections to the ISA Server computer are logged to the Firewall log. This enables you to audit VPN connections.
When you configure the VPN, you can set aside a pool of static IP addresses for the VPN users' computers. When a VPN client connects to the local network, it is assigned an IP address from this address pool. Alternatively, you can choose to have IP addresses assigned to VPN clients dynamically, by a Dynamic Host Configuration Protocol (DHCP) server. The IP address is added to the VPN Clients network.
Additionally, you can enable quarantine mode for VPN. By enabling quarantine mode, you ensure that a client is checked for compliance with corporate software policy before it is allowed to join the VPN Clients network, typically with unlimited access to the Internal network. Quarantine Control provides phased network access for remote (VPN) clients by restricting them to a quarantine mode before actually allowing them access to the network. After the client computer configuration is either brought into or determined to be in compliance with your organization's specific quarantine restrictions, standard VPN policy is applied to the connection in accordance with the type of quarantine you specify. Quarantine restrictions might specify, for example, that specific antivirus software is installed and enabled while connected to your network. Although Quarantine Control does not protect against attackers, computer configurations for authorized users can be verified and, if necessary, corrected before they can access the network. A timer setting is also available, which you can use to specify an interval at which the connection is dropped if the client fails to meet configuration requirements. For more information, see the document VPN Roaming Clients in ISA Server 2004.
You can create two different policies for each of the VPN client networks:
|
2.4 Users and authentication | |
With the new ISA Server functionality, you can apply access policy to Windows users or to users authenticated by different authentication mechanisms (namespaces), such as Remote Authentication Dial-In User Service (RADIUS). ISA Server supports the following authentication mechanisms:
ISA Server features an authentication extensibility mechanism that allows third-party vendors to implement additional authentication schemes.
You can use ISA Server to apply access policy or publishing policy to specific users or IP addresses. Users can be grouped into user sets, and rules can be applied to user sets. When you create a user set, you can add Windows, RADIUS, and SecurID users to the set. You can then apply access rules to that set.
|
2.5 Cache | |
With cache rules, you can specify the types of content stored in the cache, and how objects are served from the cache. Depending on your organization's needs, cache rules can be applied to content from all sites or to specified sites, and to all content or limited to specified content types. In addition, you can limit the amount of time that objects are considered valid, and the way cache rules handle expired objects.
By default, an object is stored in the cache only if its source and request headers indicate to do so. However, you can specify which objects are stored based on the following options:
If you select the second option, you can also choose to cache the following:
With cache rules configuration, you can define whether caching will be enabled for Hypertext Transfer Protocol (HTTP), File Transfer Protocol (FTP), and Secure Sockets Layer (SSL) responses. In addition, you can configure the cache rule to limit cached content according to file size.
Cached HTTP and FTP objects expire according to Time to Live (TTL) settings. For HTTP objects, expiration is configured based on TTL, defined in the response header, and the TTL boundaries defined in the cache rule. TTL boundaries are calculated as a percentage of content age, which is the amount of time since an object was created or modified. FTP objects expire according to the TTL defined for FTP objects in the cache rule.
As part of the cache rules configuration, you can define how objects stored in the cache are retrieved and served from the cache. Before ISA Server determines how the request will be routed, as defined in the network routing rules, ISA Server checks whether a valid copy of the object exists in the cache. An object is considered valid if its TTL period did not expire, as specified in the HTTP caching properties or on the object itself. Depending on how you configure the routing rule's cache properties, ISA Server will retrieve the object from the cache. You can configure ISA Server to do one of the following:
Cache rules are ordered, with the default cache rule processed last. For each new connection, the ISA Server computer processes the cache rules in order (that is, the first rule is processed first). If the request matches the conditions specified by the rule, the request is routed, redirected, and cached accordingly. Otherwise, the next rule is processed. This continues until the last, default rule is processed, and applied to the request.
When you install ISA Server, it configures a default cache rule. The default rule is initially configured so that only valid, requested objects will be retrieved from the ISA Server cache. If the object in the cache is not valid, it will be retrieved directly from the Internet. You cannot modify how the default cache rule retrieves objects.
|
2.6 Configuration export and import | |
ISA Server includes an export and import feature that you can use to save the server configuration parameters to an .xml file, and then import the information from the file to another server. You can save your configuration to any directory and file name for which you have write permissions.
When a configuration is exported, all general configuration information is exported by default. This includes access policy rules, publishing rules, rule elements, alert configuration, cache configuration, and ISA Server properties. Some server specific configuration information can be exported, if you select to do so. In addition, you can select to export user permission settings and confidential information, such as user passwords. Confidential information included in the exported file is encrypted. When importing the file, a password is required to open and decrypt this information. This password is set during the export process.
When you export a specific object, the following is exported:
For example, if you export an access rule, the network objects and user sets used in the creation of that rule are also exported, and will be imported when you later import the rule.
|
3.0 Installation Process | |
Before installing this software, refer to the release notes provided with the CD.
Before you install ISA Server, you must set up the hardware and configure the software of the computer that will run ISA Server.
|
3.1 Installation requirements | |
To use ISA Server, you need:
Note: If you install ISA Server on a computer running Windows 2000 Server, note the following additional requirements: Windows 2000 Service Pack 4 or later must be installed. Internet Explorer 6 or later must be installed. If you are using the Windows 2000 SP4 slipstream, you must also install the hotfix specified in article 821887, "Events for Authorization Roles Are Not Logged in the Security Log When You Configure Auditing for Windows 2000 Authorization Manager Runtime," in the Microsoft Knowledge Base. For more up-to-date information about setup and system requirements for ISA Server 2004, see ISA Server Setup and System Requirements.
Note You can use ISA Server on a computer that has only one network adapter. Typically, you will do so when another firewall is located on the edge of the network, connecting your corporate resources to the Internet. In this single adapter scenario, ISA Server typically functions to provide an additional layer of application filtering protection to published servers, or to cache content from the Internet. For more information, see ISA Server computers with a single network adapter.
Warning: Do not install ISA Server on a multi-processor computer with more than four processors.
|
3.2 Network requirements | |
ISA Server requires both a Domain Name System (DNS) server and Dynamic Host Configuration Protocol (DHCP) server. We recommend that you have both a DHCP and DNS server installed on a computer running Windows Server 2003 or Windows 2000 Server in your Internal network. If necessary, you can host the DNS and DHCP servers on the ISA Server computer.
DNS is the name resolution protocol for TCP/IP networks, such as the Internet. A DNS server hosts the information that enables client computers to resolve memorable, alphanumeric DNS names to the IP addresses that computers use to communicate with each other.
DHCP servers centrally manage IP addresses and related information and provide it to clients automatically. This allows you to configure client network settings at a server, instead of configuring them on each client computer.
To open the Configure Your Server Wizard, click Start, point to All Programs, point to Administrative Tools, and then click Configure Your Server Wizard. You will have to run the wizard twice: once to configure the DNS server, and once to configure the DHCP server.
When you configure your server to include a DNS server, when the Configure Your Server Wizard completes, the Configure a DNS Server Wizard appears. Review the DNS checklists by clicking DNS Checklists, and then follow the wizard instructions to configure the DNS server.
When you configure your server to include a DHCP server, the Configure Your Server Wizard launches the New Scope Wizard. Follow the instructions of the New Scope Wizard to define the scope for the DHCP server.
|
3.3 Installation procedure | |
To install ISA Server software, follow these steps:
There are four components that can be installed:
Typical Installation installs ISA Server Services and ISA Server Management. Full Installation installs all four components. Custom Installation enables you to select which components you will install.
|
3.4 Default settings | |
After installation, ISA Server uses the default settings that are listed in the following table.
| Feature | Default setting |
|---|---|
| User permissions | Members of the Administrators group on the local computer can configure firewall policy. |
| Network settings | The following network rules are created:
|
| Access rules | The following default rules are created:
|
| Publishing | No internal servers are accessible to external clients. |
| Web chaining | Default Rule. This rule specifies that all Web Proxy client requests are retrieved directly from the Internet. |
| Caching | The cache size is set to 0. All caching is therefore disabled. |
|
3.5 New ways to do familiar tasks | |
The following table lists common tasks you can perform using ISA Server 2004 and compares these tasks to how they were performed using ISA Server 2000.
| If you want to | In ISA Server 2000 | In ISA Server 2004 |
|---|---|---|
| Publish co-located servers. | Create a static packet filter allowing access to the specific server located on the ISA Server computer. | Create a server publishing rule. |
| Enable an application on the ISA Server computer to access the Internet. | Create a static packet filter allowing access to the specific port on the ISA Server computer. | Verify that the default network rule, which is created upon installation, accurately defines a relationship between the Local Host network and the External network. Then, create an access rule that allows access to the specific protocol. |
| Configure the local address table (LAT). | Click Local Address Table on any service's properties. | The Internal network replaces the local address table, and is configured as part of the setup process. You can subsequently reconfigure the Internal network. |
| Configure IP-based protocol support. | IP-based protocols were supported in a limited fashion. | Create a protocol definition, specifying any of the following protocols: TCP, UDP, ICMP, or IP-level. If you select IP-level, you can specify any low-level protocol. |
| Configure virtual private networking. | Use the VPN wizards to configure client-to-router or router-to-router VPN. | Configure and enable VPN properties and monitor VPN connections. |
| Configure outgoing Web request properties. | On the array properties, click the Outgoing Web requests tab and configure listener properties. | Each network has its own listener, the network adapter that is responsible for listening for requests bound for that network. |
| Configure incoming Web request properties. | On the array properties, click the Incoming Web requests tab and configure listener properties. | Web listeners are used as part of each Web publishing rule. When you configure a Web publishing rule, you specify which Web listener to use for that rule. |
|
3.6 ISA Server computers with a single network adapter | |
You can install ISA Server on computers with a single network adapter. Typically, you will do so when another firewall is located on the edge of the network, connecting your corporate resources to the Internet. In this single adapter scenario, ISA Server is typically used to cache content from the Internet for use by clients on the corporate network.
One of the fundamental features of ISA Server is its ability to connect multiple networks. When ISA Server is installed on a single adapter computer, however, it recognizes only one network-the Internal network. The Internal network comprises all IP addresses, with the following exceptions: 0.0.0.0, 255.255.255.255, and the address range 127.0.0.0-127.255.255.255.
As part of the setup process, you specify the addresses in the Internal network. When you install ISA Server on a computer with one network adapter, be sure to include all addresses except 0.0.0.0, 255.255.255.255, and the address range 127.0.0.0-127.255.255.255.
You can use the Single Network Adapter network template to configure your single adapter ISA Server computer. To use the template, in ISA Server Management, expand the Configuration node, and select Networks. In the task pane, on the Templates tab, select Single Network Adapter to start the Network Template Wizard. Follow the wizard steps to complete the configuration. We recommend that you use the default settings provided by the Network Template Wizard.
You can deploy ISA Server on a single adapter computer as a forward proxy and caching server, which provides clients with optimized access to the Internet. In this scenario, you can configure ISA Server to maintain a centralized cache of frequently requested Internet objects that can be accessed by any Web browser client, and use cache rules to manage the cache. In this scenario, you will modify the default firewall policy to allow internal clients access to the Internet. Although all IP addresses are considered to be on the same Internal network, ISA server will deny Web traffic due to the default Deny All rule. You therefore need to create a rule that allows Web traffic to pass between the networks. To enable this caching scenario, you must create an access rule that allows all clients to use HTTP (and HTTPS and FTP, as appropriate). Because the Internal network is uniquely defined to include all addresses, the source and destination networks for this rule should be internal.
When you install ISA Server on a computer with a single adapter, the following ISA Server features cannot be used:
This results in a limited security role for ISA Server in your network.
|
4.0 Feature Walk-through | |
ISA Server supports a highly flexible, multi-networking environment, enabling you to securely connect numerous networks with varying access permissions. Some sample scenarios illustrating the multi-networking environment and functionality are described in the following sections. Note that the scenarios do not illustrate the complete scope of new features included in this release. Rather, they demonstrate some of the more common firewall scenarios that you can deploy using ISA Server. By performing the walk-through steps in a simple laboratory environment, you can become familiar and comfortable with some of the ISA Server 2004 features and with the user interface.
We recommend that you always create your ISA Server configuration in a laboratory environment before you try it in production.
The scenarios assume a lab configuration connecting an Internal network to the Internet. Various servers are published on a perimeter network (also known as a DMZ, demilitarized zone, or screened subnet). Virtual private network (VPN) clients can access resources on the Internal network. We recommend that you set up three isolated networks in a laboratory environment before deploying a solution in a production environment. The laboratory used in this feature walk-through consists of:
The following figure illustrates the scenario environment.
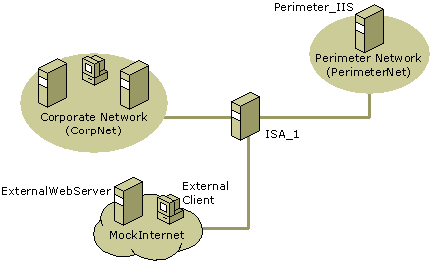
The figure illustrates the following computers:
Note: There are no DNS servers described in the configuration. The scenario assumes that a DNS server is installed on the domain controller on CorpNet. The scenario also assumes that there is name resolution within each network, but not between the networks.
The configuration would be similar in a production environment. The differences would be in the use of the default ISA Server defined External network (representing the Internet) rather than MockInternet, and the use of your real IP address ranges for your internal and perimeter networks.
Different computers are required to test the various scenarios. The following table lists which computers are required for each scenario.
| Scenario | Computers required |
|---|---|
| 4.1 Export a configuration | ISA_1 |
| 4.2 Access the Internet from the Internal network | ISA_1, InternalClient1, ExternalWebServer |
| 4.3 Create and configure a restricted computer set | ISA_1, InternalClient2, External1 |
| 4.4 Create a perimeter network using the Network Template Wizard | ISA_1 |
| 4.5 Publish a Web server on the perimeter network | ISA_1, External1, Perimeter_IIS |
| 4.6 Publish a Web server on the Internal network | ISA_1, InternalWebServer, External1 |
| 4.7 Configure virtual private networking | ISA_1, External1, InternalClient1 |
| 4.8 Modify system policy | ISA_1 |
| 4.9 Import a configuration | ISA_1 |
Before you begin configuring the following scenarios, verify that the routing tables on the computers are properly configured. On each network, the default gateway must be set to the IP address of the ISA Server computer's adapter for that network. For example, to set the default gateway for Perimeter_IIS, type the following at a command prompt on the Perimeter_IIS computer:
route add 0.0.0.0 MASK 0.0.0.0 172.16.0.1
|
4.1 Scenario 1: Export a configuration | |
This scenario illustrates the export feature of ISA Server. You can save all or parts of an ISA Server computer's configuration to an .xml file. This enables you to duplicate all or part of a configuration from one ISA Server computer to another, or to preserve a configuration before you make substantial changes, so that you can revert to an earlier configuration.
In this scenario, you will export the configuration of the ISA Server computer to an .xml file before you make any of the changes associated with the scenarios that follow. To export the configuration, perform the following steps:
Notes You can choose to export user permission settings, by selecting Export user permission settings. User permission settings contain the security roles of ISA Server users, for example, indicating who has administrative rights.
If you want to export confidential information, select Export confidential information. If you do, confidential information will be encrypted during export. If you export confidential information, you will be prompted to provide a password during the export process. You will need this password when you import the firewall policy configuration.
|
4.2 Scenario 2: Access the Internet from the Internal network | |
In this scenario, internal clients require secured connectivity to the Internet. The following computers are required:
The goal is to access ExternalWebServer from InternalClient1 through ISA_1.
The routing table on InternalClient1 routes all requests for external addresses to the internal IP address of the ISA Server computer (the IP address of the network adapter card that is connected to the Internal network). The ISA Server computer is serving as the default gateway for all Internal network requests for external IP addresses.
The following sections describe how to configure the solution:
As part of the setup process, you specified the address range in your Internal network, thereby configuring the Internal network. Verify that the configuration is valid, and that the Internal network contains only addresses on Corpnet. On ISA_1, perform the following steps:
Note: If necessary, you can reconfigure the Internal network by double-clicking Internal on the Networks tab to open the Internal Properties dialog box. Select the Addresses tab, and use the Add and Remove buttons to add or remove address ranges from the network. You can also use the Add Adapter button to add all of the IP ranges associated with a particular network adapter, or the Add Private button to add private address ranges.
As part of the installation process, a default Internet Access network rule was created. This rule defines a relationship between the Internal network and the External network. To verify the rule configuration, perform the following steps:
To allow the internal client access to the Internet, you must create an access rule allowing the internal clients to use HTTP and HTTPS protocols. Perform the following steps:
To verify that the scenario works, InternalClient1 will access ExternalWebServer on the External network (MockInternet).
On InternalClient1, perform the following steps:
If your browser displays the Web page published on ExternalWebServer, InternalClient1 accessed ExternalWebServer, and you have successfully configured this scenario.
|
4.3 Scenario 3: Create and configure a restricted computer set | |
In this scenario you will create a computer set within the Internal network, and deny it access to the Internet. The following computers are required:
The following sections describe how to configure the solution:
The following example uses the IP addresses associated with the lab deployment Internal network: 10.0.0.0 through 10.255.255.255. In the example, you will create a computer set containing the IP addresses 10.54.0.0–10.55.255.255, which includes InternalClient2. Perform the following steps:
You can now create an access rule denying Internet access to the computer set. Note that the order of the access rules will affect whether the computer set will be able to access the Internet. ISA Server reads access rules in order, and will allow access if it reads the Internal network allow rule before it reads the Restricted Computer Set deny rule.
To create an access rule that denies access from the Restricted Computer Set to the External network, perform the following steps:
To verify that the scenario works, InternalClient2 in the Restricted Computer Set will try to access ExternalWebServer on the External network (MockInternet).
On InternalClient2, perform the following steps:
If your browser displays an access denied page, you configured the computer set and deny rule successfully.
The deny access rule you created appears first in the list of access rules in the Firewall Policy details pane. If you move it down in order below the Allow Internal clients HTTP and HTTPS access to the Internet allow rule (created in the previous scenario), ISA Server will evaluate the allow rule first, and computers in the Restricted Computer Set will have access to the Internet. To change the order of the deny rule, right-click the rule and select Move Down. After you move the deny rule below the allow rule and apply changes by clicking the Apply button in the details pane, test the Internet access again. InternalClient2 should now have Internet access.
If your browser now displays the Web page published on ExternalWebServer, InternalClient2 accessed ExternalWebServer, and you have successfully configured this scenario.
|
4.4 Scenario 4: Create a perimeter network using the Network Template Wizard | |
In this scenario, you will use the Network Template Wizard to create a perimeter network.
To configure this scenario, you will perform the following steps:
You will use the Network Template Wizard to create the perimeter network, and to establish Internet access from the Internal network to the Internet.
To create a perimeter network, perform the following steps:
Note: The Network Template Wizard creates two network rules: one that creates a route relationship between the perimeter network and the External network (the Perimeter Access rule), and one that creates a NAT relationship between the Internal network and the perimeter network (the Perimeter Configuration rule). Verify that the rules were created by selecting the Network Rules tab in the Networks details pane.
A route relationship is bidirectional. Routing is from source to destination and destination to source. A NAT relationship is unidirectional. Routing is from source to destination.
When you ran the Network Template Wizard and applied changes, you removed the restricted computer set and the access rule denying the restricted computer set access to the Internet. You could create these again, or you can import them from the .xml files you saved when you created the restricted computer set and its access rule.
To import the configuration, perform the following steps:
Note When you import an access rule, you also import the rule elements that it refers to, so there is no need to import the computer set separately. You can import rule elements separately by right-clicking the type of rule element in the task pane, on the Toolbox tab, and selecting Import All.
|
4.5 Scenario 5: Publish a Web server on the perimeter network | |
In this scenario, a Web server located on the perimeter network will be made available to users on the Internet.
You use Web publishing rules to publish Web servers. Web publishing rules require Web listeners, which listen for Web requests.
The following computers are required:
To configure this scenario, you will perform the following steps:
To create a Web publishing rule allowing a client computer on the Internet (External1) access to a Web server on the perimeter network (Perimeter_IIS), perform the following steps:
Note: On the Define Website to Publish page, in Folder, you can specify a specific folder to publish.
Note: You can create and modify Web listeners independently of Web publishing rules. Access to existing Web listeners is through the Web Listeners folder on the Toolbox tab in the Firewall Policy task pane. To create a new Web listener, in the Firewall Policy task pane, on the Toolbox tab, click New, and then select Web Listener.
To verify that the scenario works, the external client, External1, will access Perimeter_IIS, the HTTP server located on the perimeter network (PerimeterNet). On External1, perform the following steps:
If the client accessed the default website on Perimeter_IIS, you successfully configured this scenario.
|
4.6 Scenario 6: Publish a Web server on the Internal network | |
In this scenario, a Web server located on the Internal network will be made available to users on the Internet. The following computers are required:
To configure this scenario, you will perform the following steps:
Before you verify the network rule defining the network relationship between Internal and External networks, see section 4.2.1 for instructions on validating the configuration of the Internal network.
Upon installation, a default network rule, defining a NAT relationship from the Internal network to the External network, was created. On ISA_1, to verify that the rule is properly configured, perform the following steps:
Use Web publishing rules to allow external clients to access the Web server located on the Internal network.
Publishing the Web server requires that you create a Web publishing rule. In the process of creating the rule, you will also create a Web listener that specifies on which IP addresses ISA Server will listen for requests for the internal website. If you still have the listener that you created for the perimeter Web publishing scenario, you should use it in this scenario, rather than create a new listener.
Note: You can create and modify Web listeners independently of Web publishing rules. Access to existing Web listeners is through the Web Listeners folder on the Toolbox tab in the Firewall Policy task pane. To create a new Web listener, in the Firewall Policy task pane, on the Toolbox tab, click New, and then select Web Listener.
To create a Web publishing rule allowing a client computer on the Internet (External1) access to a Web server on the Internal network (InternalWebServer), perform the following steps:
Note: On the Define Website to Publish page, in Folder, you can specify a specific folder to publish. In a laboratory setting where there is no DNS server, you would use the same IP address to identify both the perimeter and internal Web servers, so only one will be available at a time, based on which rule appears first in the rule order. In a production deployment, or in a laboratory deployment with a DNS server, the use of names that are resolved by a DNS server would eliminate this issue.
To verify that the scenario works, the external client, External1, will access InternalWebServer, the HTTP server located on the Internal network (CorpNet). ISA_1 will listen for the requests on behalf of InternalWebServer, and forward them in accordance with the Web publishing rule to InternalWebServer.
On External1, perform the following steps:
If the client accessed the default website on InternalWebServer, you successfully configured this scenario.
|
4.7 Scenario 7: Configure virtual private networking | |
In this scenario, ISA Server serves as the VPN server for remote clients connecting to the corporate (Internal) network. The following computers are required:
The following sections describe how to configure the scenario:
In this step, you will enable VPN client access. To allow VPN connections, you must enable virtual private networking. All other VPN client properties will assume the default settings. This includes the default settings for the pool of IP addresses dynamically assigned from the Internal network, which will be available for clients connecting to ISA Server. This solution also assumes a dynamically assigned name resolution server that VPN clients can use to resolve names on the Internal network.
To configure the VPN properties, perform the following steps:
Note: During installation, ISA Server creates a network rule establishing a route relationship between the VPN clients and the Internal network. If you want certain VPN clients to be able to access other networks, you must create an additional network rule. The relationship between the VPN client and the Internal network is a route relationship, because the goal is for the VPN client to transparently become part of the Internal network, and be able to see the computers on the Internal network.
If your laboratory configuration does not include a DHCP server that assigns IP addresses to VPN clients, to create a static address pool from which the addresses will be assigned, perform the following steps:
To allow the VPN clients access to resources on the Internal network, you must create an access rule. Perform the following steps:
Note: You can restrict which protocols the VPN clients can use when communicating with the Internal network by selecting Selected protocols in step 5. In this case, be sure to include the DNS Query protocol, so that VPN clients can resolve the names of computers on the Internal network.
You could also create a rule allowing only certain users access to specific computers, or to parts of your corporate network that you have defined separately from the Internal network.
For a VPN client to dial in to the network, you must create a user with dial-in permissions on CorpNet. The user can be a domain user or a local user on the ISA Server computer. The VPN client will authenticate as this user. Perform the following steps:
The VPN client creates a new connection that can be used to dial in to the CorpNet. On External1, perform the following steps:
To verify that the scenario works, the VPN client, External1, will access a computer on the Internal network. On External1, perform the following steps:
If the connection is created, you successfully configured this scenario.
|
4.8 Scenario 8: Modify System Policy | |
We recommend that you disable elements of the system policy that you are not going to use. This scenario demonstrates how to disable Terminal Server remote management of ISA Server.
To disable Terminal Server remote management of ISA Server, perform the following steps:
|
4.9 Scenario 9: Import a configuration | |
This scenario illustrates the export and import feature of ISA Server. This scenario relates to Scenario 1, Export a configuration.
In this scenario, you will perform the following procedures:
To export the current configuration to an .xml file, perform the following steps:
Notes: You can choose to export user permission settings, by selecting Export user permission settings. User permission settings contain the security roles of ISA Server users, for example, indicating who has administrative rights.
If you want to export confidential information, select Export confidential information. If you do, confidential information will be encrypted during export. If you export confidential information, you will be prompted to provide a password during the export process. You will need this password when you import the firewall policy configuration.
To import configurations, perform the following steps:
Note: You can choose to import user permission settings, by selecting Import user permission settings. You can also choose to import cache drive settings and SSL certificate usage configuration by selecting Import cache drive settings and SSL certificates. This may be inappropriate when copying a policy to another server, because these selections tend to be specific to a particular server.
Information in this document, including URL and other Internet website references, is subject to change without notice. Unless otherwise noted, the example companies, organizations, products, people, and events depicted herein are fictitious and no association with any real company, organization, product, person, or event is intended or should be inferred. Complying with all applicable copyright laws is the responsibility of the user. Without limiting the rights under copyright, no part of this document may be reproduced, stored in or introduced into a retrieval system, or transmitted in any form or by any means (electronic, mechanical, photocopying, recording, or otherwise), or for any purpose, without the express written permission of Microsoft Corporation.
Microsoft may have patents, patent applications, trademarks, copyrights, or other intellectual property rights covering subject matter in this document. Except as expressly provided in any written license agreement from Microsoft, the furnishing of this document does not give you any license to these patents, trademarks, copyrights, or other intellectual property.
© 2004 Microsoft Corporation. All rights reserved.
Microsoft, Active Directory, NetMeeting, Outlook, Windows, Windows Media®, and Windows NT® are either registered trademarks or trademarks of Microsoft Corporation in the United States and/or other countries/regions.