On the toolbar in the Label Edit view, click ![]() button, or on the Image menu, select Background. Background
Settings dialog box appears.
button, or on the Image menu, select Background. Background
Settings dialog box appears.
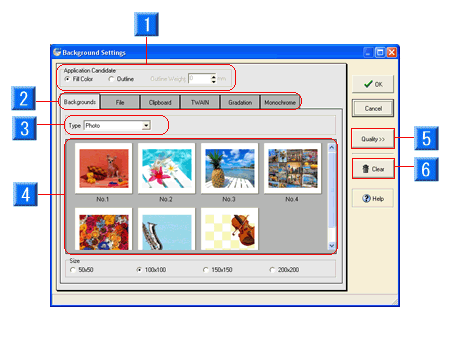
Select an application candidate, and use the tabs to select an image you
want to use for the background.

- Application Candidate: You will select a candidate to apply the background to. Fill Color applies the background to the entire label, and Outline applies to the outline of the label in the specified thickness.
- Format tabs: These are the tabs to select the background format. Click an appropriate tab.
- Type: You can select the background style, from Photo or Illust.
- Image Preview: Displays the preview of the pictures.
- Quality >>: In the Background Image Adjustment dialog, you can adjust the quality of the selected image. For details, refer to "Functions > Editing Objects > Background/Image > Adjust an image".
- Clear: Deletes the set background.
* You can also select Properties on the right-click menu in the Label Edit view to display the same window.
* To specify other backgrounds, refer to "Functions > Editing Objects > Background/Image > Select an image".
When you have finished selecting a background, click the OK button.
The background will be set.
* The background cannot be moved or enlarged, unlike the other objects. You can adjust the print range in the Background Print Range dialog box. For details, refer to "Functions > Editing Objects > Background/Image > Adjust an image".