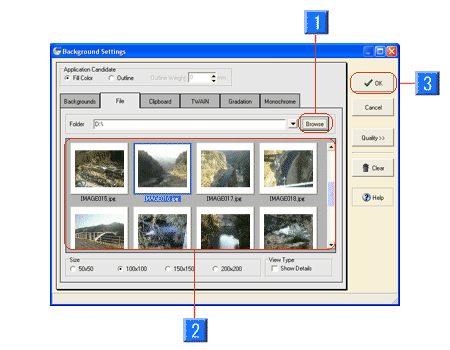
Other than the data stored in CD-LabelPrint, your image data and data imported from TWAIN devices can be used for the background, images, and text, with the same operations in each dialog. This section shows an example of selecting a background.
* To load an image from backgrounds (images), refer to "Functions > Adding Objects > Background (Image)".
On the toolbar in the Label Edit view, click ![]() to display Background Settings dialog box.
to display Background Settings dialog box.
First, select File tab. You can import an image file (BMP, JPG,
PhotoCD, WMF, or EMF format)saved to the disk.

Click (1)Browse button, and select a folder to reference. From a list of (2) image data, select data. Press the (3) OK button to set the image to the background.
* You can also enter path directly into Folder.
* Check Show Details on for View Type to display image size and date modified.
To load an image saved to the clipboard, select Clipboard tab.
If the data was saved, you can set the data to the background. Press
the OK button.
* In general, Windows assigns a shortcut for copying the screen to the PrintScreen key.
If you have a TWAIN device, such as a scanner or a digital camera, you can
import an image from the device and paste to the background. Select TWAIN
tab.
Press Import button to import an image.
* For details, refer to "Functions >
Adding Objects > Import an image from TWAIN device".
* For information on how to use a scanner or a digital camera, refer to
the operating instructions of the device you are using.
As with text and figures, you can specify gradation or monochrome to the fill color of the background, in Gradation and Monochrome tab.
For information on how to specify monochrome, refer to "Functions > Adding Objects > Figure", to specify gradation, refer to "Editing Objects > Text > Decorate text".