
You can connect to a wireless network with one of the following methods.
Intel PROSet/Wireless automatically detects wireless networks that are within range of your wireless adapter. When a network is found, a desktop alert notification displays: Wireless networks found. See Taskbar Icons for more information.
If you need to add security authentication:
If you ignore the Wireless networks found desktop alert, Intel PROSet/Wireless displays a message that prompts: Do you want to connect to a wireless network? Click Yes. The Intel PROSet/Wireless main window opens. Follow the instructions above to connect to a wireless network.
In addition to the Taskbar icon, Intel PROSet/Wireless also displays connection status and available networks. Refer to Intel PROSet/Wireless Main Window for more information.
If the Intel PROSet/Wireless detects another software application trying to communicate with the wireless device, you are notified of this behavior.
To switch from Intel PROSet/Wireless to the Microsoft Windows XP Wireless Zero Configuration, use either of the following methods:
Click Use Windows to manage Wi-Fi to switch to Microsoft Windows XP Wireless Zero Configuration. Select this option to disable Intel PROSet/Wireless as your current wireless manager. You can then configure Microsoft Windows XP as your wireless manager.
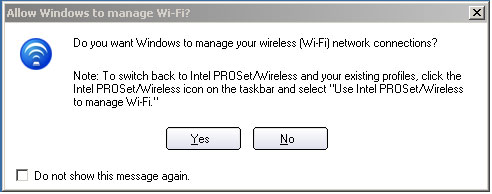
NOTE: Any wireless profiles created in Intel PROSet/Wireless are not visible in Microsoft Windows XP Wireless Zero Configuration. If you want to use your Intel wireless profiles you need to select Use Intel PROSet/Wireless to manage Wi-Fi from the Taskbar menu.
From Intel PROSet/Wireless:
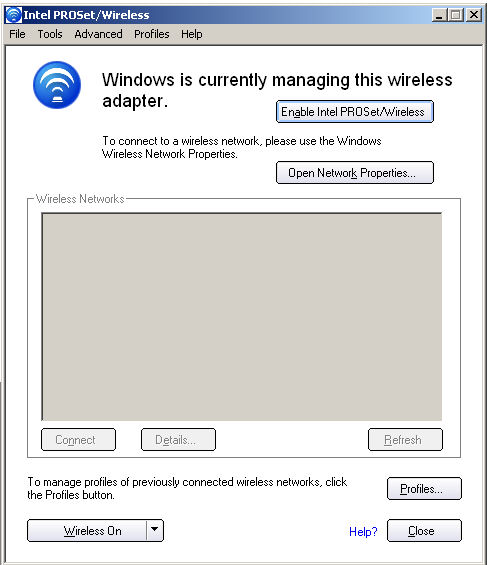
From, the Advanced menu, click Use Windows to manage Wi-Fi in the Intel PROSet/Wireless application. When you are finished using the Microsoft Windows XP Wireless Zero Configuration, you can switch back to Intel PROSet/Wireless. Click Enable Intel PROSet/Wireless on the Intel PROSet/Wireless main window.
To enable Intel PROSet/Wireless as your wireless manager, click Use Intel PROSet/Wireless to manage Wi-Fi from the Taskbar menu.
If you use software provided by a hotspot location (coffee shop, airport terminal), Intel PROSet/Wireless notifies you and then disables itself. It cannot manage the wireless device when another wireless manager communicates with the wireless device. To take advantage of the Intel PROSet/Wireless features, you want to disable or remove this software when you leave the hotspot.